Salesforce Screen Flow Lookup Fields: Step-by-Step Guide
Feb 12, 2025
Salesforce Screen Flow Lookup Fields: Step-by-Step Guide
Using lookup fields in Salesforce Screen Flows doesn’t have to be confusing. In this beginner-friendly guide, you’ll learn exactly how to add and configure the Lookup component in a flow screen so users can search for and select records – just like a standard Salesforce lookup field. We’ll cover what lookup fields in flows are, key things to know (and pitfalls to avoid), and walk through the setup step by step. By the end, you’ll be able to seamlessly incorporate lookup functionality into your flows. Let’s dive in!
What Is a Lookup Field in a Salesforce Screen Flow?
A lookup field in a Screen Flow is a screen component that lets your users search for an existing Salesforce record and select it, all within a flow. It behaves similar to a lookup field on a Salesforce record page – when the user clicks it, they can type to search, see a list of matching records, and pick one. This is incredibly useful in flows where you need the user to choose an existing record (like an Account, Contact, etc.) as part of a process, instead of typing an ID or name manually. Salesforce introduced this standard Lookup component for flows in Winter ’20, making it much easier to incorporate record search in your automation screens.
Why use a lookup in a flow? Imagine a flow that creates a Case and you want the user to associate it with an Account or Contact. With a lookup field on the flow screen, the user can simply search and select the Account or Contact record, ensuring accuracy and saving time. No need to copy-paste record IDs – the flow handles it with a familiar Salesforce search interface.
Before we get into the steps, keep in mind a few important considerations for using lookup fields in flows:
-
Use an existing lookup field: The flow’s Lookup component doesn’t magically create a relationship out of thin air – it must reference an actual lookup field on a Salesforce object. In the component’s properties, you specify a Field API Name and an Object API Name. The field must be a lookup or master-detail on that object. For example: To let users look up an Account, use a lookup field that points to Account (like the
AccountIdfield on Contact or Case) as the Field API Name, and set the Object API Name to the object that field belongs to (e.g.ContactorCase). You cannot just put Object API Name asAccountand Field asName– that won’t work, because Name isn’t a lookup field (and the component requires a relationship field). In short, choose an object that has a lookup to your target record. -
User permissions matter: The running user must have Create permission on the object that the lookup field is on for the Lookup component to function. Salesforce requires create access on the “source” object in order to search its records via the flow lookup. For example, if your lookup uses the Contact object’s
AccountIdfield (source object Contact), the user needs create access on Contact to use the lookup. Without proper access, the lookup field may appear empty or give an error. -
Lookup filters aren’t enforced: Any lookup filters defined on the field in object setup are ignored in the flow Lookup component. The component will show all records the user can access, not just those that meet your filter criteria. For instance, if a Contact lookup on a form would normally filter to only contacts for a chosen Account, the flow lookup won’t honor that automatically. Tip: If you need to restrict results (e.g. only show Contacts related to a specific Account the user selected earlier), you’d have to use a different approach (such as a picklist driven by a Record Choice Set or a custom component) – the standard lookup component won’t apply that filter out-of-the-box.
-
Some fields aren’t supported: Not every lookup field can be used. For example, OwnerId (the standard owner field on many objects) cannot be used in the flow lookup component – if you try, you’ll get an error that it’s not a valid lookup field. Salesforce documentation notes to use an alternative like
CreatedByIdif you need a user lookup. Also, Person Account lookups have special caveats (the Contact’s AccountId trick won’t return Person Accounts). Keep these in mind when choosing your Field API Name. -
You can allow multiple selections: By default, the lookup component lets the user select one record. But as of Winter ’23, Salesforce enhanced it to support multi-select. You can enable this in the component properties by setting a “Maximum Selection” greater than 1. This allows the user to pick more than one record from the search results. For example, you could let a user select up to 3 related records in one lookup. If you use this, the component will output a collection of record IDs instead of a single ID. (We’ll touch on using multiple selections later.)
With the basics covered, let’s get into the actual steps to set up a lookup field in your flow.
Step-by-Step: How to Add a Lookup Field to a Salesforce Screen Flow
Follow these steps to add a Lookup field component to your Screen Flow and configure it properly in Flow Builder:
-
Open or create a Screen Flow in Flow Builder: In Salesforce Setup, go to Quick Find -> Flows (in Lightning Experience) and click New Flow. Select Screen Flow as the flow type (since we want a flow with screens for user input). If you already have a Screen Flow where you want to add a lookup, edit that flow in Flow Builder. You should see the flow canvas where you can add elements.
-
Add a Screen element: In a new Screen Flow, click add element and select the Screen element. Give the screen a label (e.g. “Select Account”) so you know its purpose. This screen is where we’ll place the lookup field.
-
Drag the Lookup component onto the screen: With your Screen element open for editing, you’ll see the Screen Components palette (usually on the left side in Flow Builder). Scroll through the standard components and find Lookup. Click and drag the Lookup component onto your screen canvas (typically into the middle panel where it says “Add a Field”). This adds a lookup field to your flow screen.
-
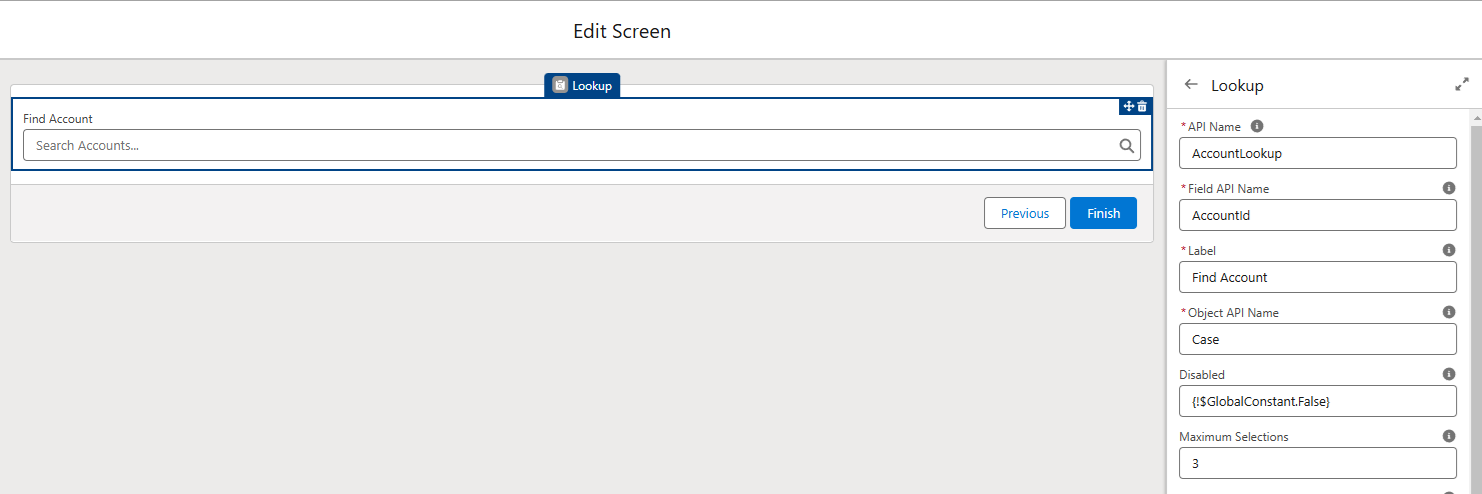
Configure the Lookup field properties: Now, on the right-side panel, you’ll see the properties for this Lookup component. Fill them out as follows:
-
API Name: This is a unique name for this component in the flow (no spaces or special characters). It’s for internal reference in the flow. Give it a clear name, like
Account_LookuporContactLookup, depending on what you’re looking up. (For our example, if the screen is to select an Account, we might useAccountLookupas the API name.) -
Field API Name: This is critical! Here, you specify the API name of the lookup field you want to use. This must be a lookup or master-detail field on some object. For example, to let the user lookup an Account, you could use
AccountId(which is the API name of the Account lookup field on objects like Contact, Case, Opportunity, etc.). In our example, let’s say we want to select an Account for a new Case we’re creating in the flow – we’ll use the Case’sAccountIdfield. So we put AccountId as the Field API Name. (If you’re using a custom lookup field, remember to include the “__c” at the end of the API name.) -
Object API Name: Here you put the API name of the object that the above field belongs to. In our example,
AccountIdis a field on the Case object (Case has a lookup to Account), so we set Case as the Object API Name. This combination tells the flow: “We’re using the AccountId lookup field on the Case object,” which effectively means the user will be searching among Account records (because AccountId on Case points to Account records). If instead we wanted a Contact lookup, we might set Field API Name toContactIdand Object API Name toCase(for Case’s contact lookup) or another object that has a Contact lookup. The general rule is: put the object that has the lookup field, and the API name of that lookup field. -
Label: This is the user-facing label on the screen. Enter something friendly that tells the user what to do, e.g. *"Account" or "Find Account". In our case, we might write “Account (lookup)” or “Account to associate with Case”. The label appears above or next to the lookup box on the screen.
-
Required: If the user must select something before proceeding, check the Required box. For instance, if it’s critical they pick an Account, mark it required so the flow won’t let them continue without an Account. If it’s optional, leave this unchecked.
-
Max Selection: If you want to allow multiple record selections, set this to a number >1. By default it’s 1 (single select). For example, if this lookup should let the user pick up to 3 records, set Maximum Selection = 3. (If you do this, also adjust the label to indicate they can select multiple, and be prepared to handle a collection of IDs in the flow logic.) If you only need one record, you can ignore this or keep it at 1.
Double-check that your Field API Name and Object API Name are valid and correspond to a real lookup field. If something is wrong here, the flow will throw an error at runtime. Common mistake: picking an object/field combo that don’t match. For example, if you set Object API Name to
Accountand Field API Name toContactId, that will not work becauseContactIdisn’t a field on the Account object (Account doesn’t have a Contact lookup – it’s the other way around). Make sure the field exists on the object you specify. If you do accidentally configure an invalid pair or a disallowed field (like OwnerId), you’ll likely see an error when running the flow (e.g. “XYZ is not a valid lookup field” or it might fail to render). If that happens, revisit this step and correct the names (or choose a different lookup field). -
-
Add any other screen fields or text (optional): You can add other fields or instructions on the same screen as needed. For instance, you might include a Display Text component with instructions like “Search for the account name and select the correct Account from the results.” This could be helpful for users who are new to the interface. You could also add a second lookup on the screen if you need, say, one for Account and another for Contact – just make sure to give each lookup component a unique API Name and configure their Field/Object API Names appropriately (you can reuse the same lookup field on multiple components as long as the API names of the components differ). Arrange the screen layout as desired.
-
Save and Finish the screen setup: Once you’ve configured the Lookup component (and any other screen components), click Done to save the Screen element. Back on the flow canvas, connect the Screen to whatever comes next in your flow. For example, if this flow is meant to create a Case after the user selects an Account, you’d connect the Screen to a Create Records element (which creates a Case record using the selected Account Id). Ensure your flow elements are connected properly (Screen → [next element] → … → End).
-
Use the selected lookup value in your flow: The whole point of adding a lookup field is to do something with the chosen record. The Lookup component’s output will be the record ID (or IDs, if multi-select) of the record the user selects. You can reference this in subsequent flow elements. For instance, if your lookup component’s API Name is
AccountLookup(and it was tied to Case’s AccountId field), then after the screen you can refer to{!AccountLookup}as the ID of the Account the user picked. In a Create Records element for a new Case, you’d set the Case’s AccountId field to that{!AccountLookup}value. If you need additional information about the selected record (say you need the Account’s Industry or a Contact’s Email that weren’t directly provided by the lookup), you can use a Get Records element after the screen to query that record by its ID and retrieve more fields. The lookup gives you the record’s Id; from there you have the power to do anything you need with that (update a record, pass it into a subflow, use it in a formula, etc.).- Handling multiple selections: If you allowed multiple records to be selected (Max Selection > 1), the lookup component will output a Collection of record IDs (essentially a list). You might see the variable as
{!AccountLookup}but it represents multiple values. In that case, if you want to, say, update all selected records or loop through them, you can use a Loop element to iterate over the collection of IDs and handle each one (see our looping guide linked below for details). If you just need to pass the collection as-is (for example, maybe to another flow or an Apex action), you can do that too. Just be mindful that the data type differs when multiple are selected.
- Handling multiple selections: If you allowed multiple records to be selected (Max Selection > 1), the lookup component will output a Collection of record IDs (essentially a list). You might see the variable as
-
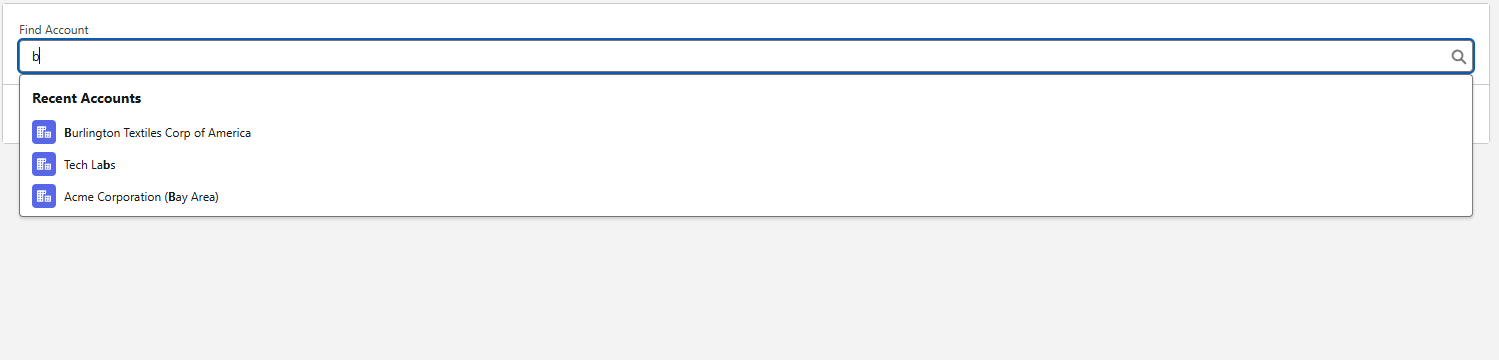
Test the flow: It’s always a good idea to debug or run the flow to ensure your lookup field works as expected. In Flow Builder, click Debug on the top-right. Run the flow in debug mode (you can run it as yourself to test the lookup). When the screen appears, try searching in the lookup field for a record you know exists (e.g. start typing “Acme” for Account, and see if matching Acme Corp shows up). Select a record and proceed. If the flow returns results and lets you select, then the lookup is configured correctly. Complete the flow to make sure the downstream logic (using that selected value) works.
- Troubleshooting: If you cannot find any records when you search, or the lookup field is not functioning, double-check the permissions (are you running as a user who has access and create perms on that object?). If you get an error like “XYZ is not a valid lookup”, verify that the Field API Name and Object API Name are correct and that field indeed exists on that object (for example, remember OwnerId won’t work as mentioned). Also ensure the component’s API Name is unique in the flow. By debugging, you’ll catch misconfiguration issues early. Once it’s working in debug, Activate the flow (if it’s a new flow or a new version) so that your users can run it in the intended context (e.g. from a Lightning page or quick action).
By following the above steps, you should have a Screen Flow with a fully functional lookup field. Users will be able to effortlessly search for a record and select it, and your flow can then use that selection just like any other input. This not only improves the user experience of your flows (no one likes having to find and type Record IDs!) but also reduces errors by leveraging Salesforce’s search capabilities.
As a special bonus, here are some common setup scenarios in a handy cheat sheet: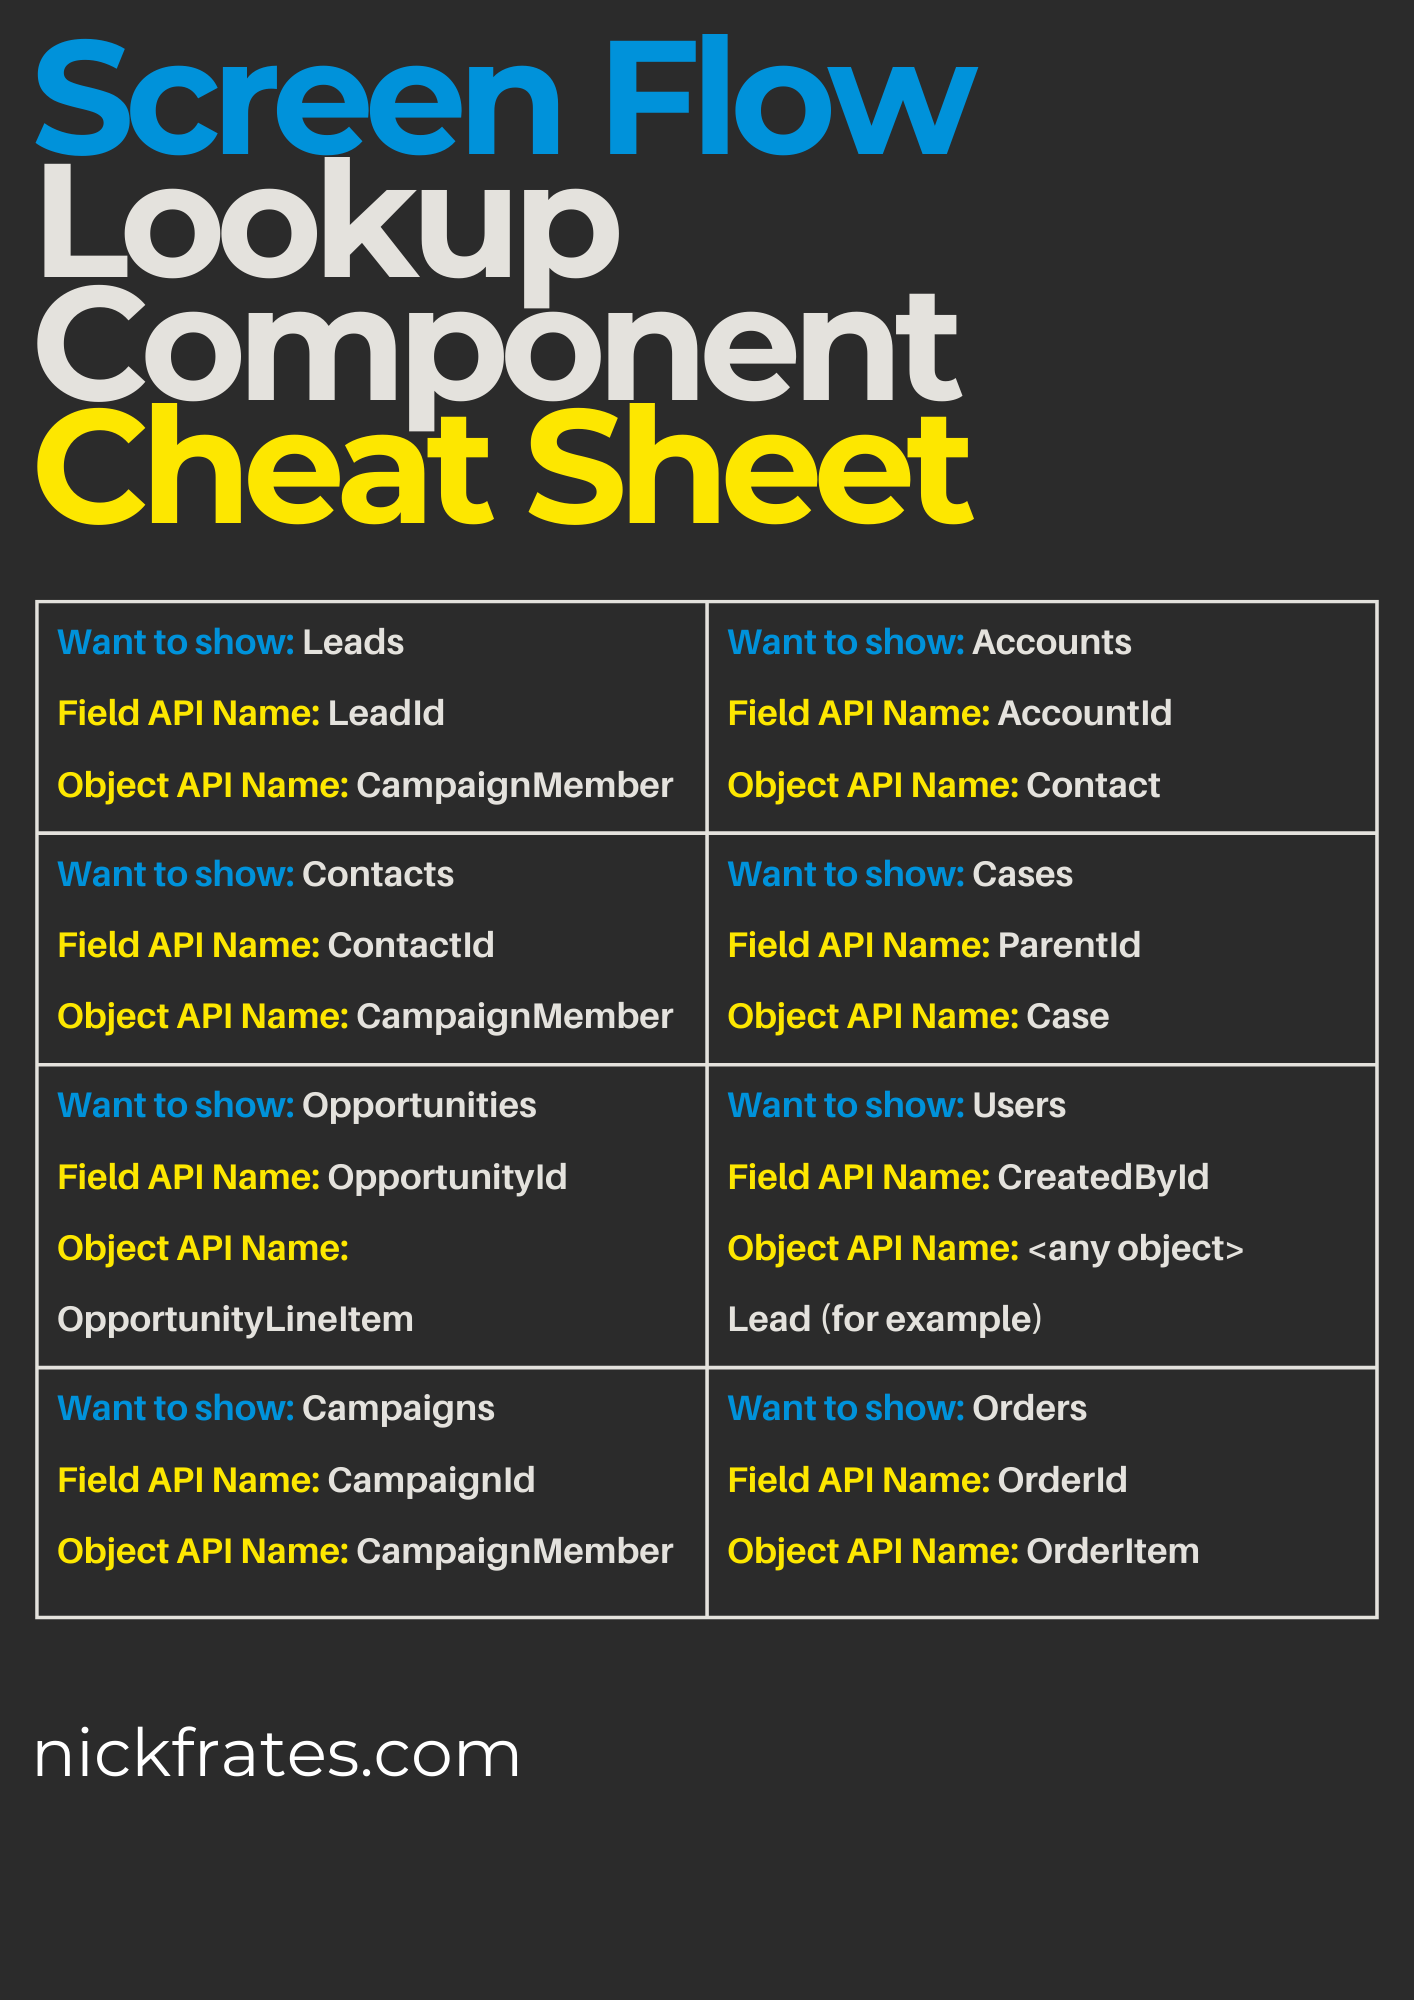
Internal Links
If you found this tutorial helpful, you might also enjoy other Salesforce Flow guides on our blog. For example, check out our article on Get Records in Salesforce Flow: Step-by-Step Guide – it shows how to retrieve additional details for a record in a flow, which is perfect if you need to fetch more info after a user selects a record via your lookup. And don’t miss our Salesforce Flow Best Practices for Efficient and Scalable Automation guide, which covers tips to design flows (including screen flows) that run smoothly and are easy to maintain. Following best practices will help you avoid common pitfalls as you add components like lookups to your flows.
Now that you know how to use the Lookup component, you’re one step closer to Salesforce Flow mastery. Happy Flow-building!
Ready to become a Salesforce Flow expert? Don’t stop at just one component – take your skills to the next level with our comprehensive course. Enroll in the 2025 Salesforce Flows Complete Guide – an online, self-paced course that covers everything from beginner basics to advanced techniques. It’s taught by a 17x Certified Salesforce Architect with 8+ years of experience, and has been refined with feedback from over 15,000 students to ensure you get the best learning experience. You’ll learn pro tips and hands-on strategies to build powerful automations (far beyond just screen flow lookups) and become the go-to Flow guru on your team. Don’t miss out on the opportunity to future-proof your career and skyrocket your Salesforce expertise – enroll now and supercharge your Flow skills today!
Salesforce Saturdays
Join the Salesforce Saturday newsletter. Every Saturday, you'll get 1 actionable tip on Salesforce technology or career growth related to the Salesforce Industry.
We hate SPAM. We will never sell your information, for any reason.
