How to Get the Current Record Id in a Salesforce Screen Flow (Step-by-Step Guide)
Feb 21, 2025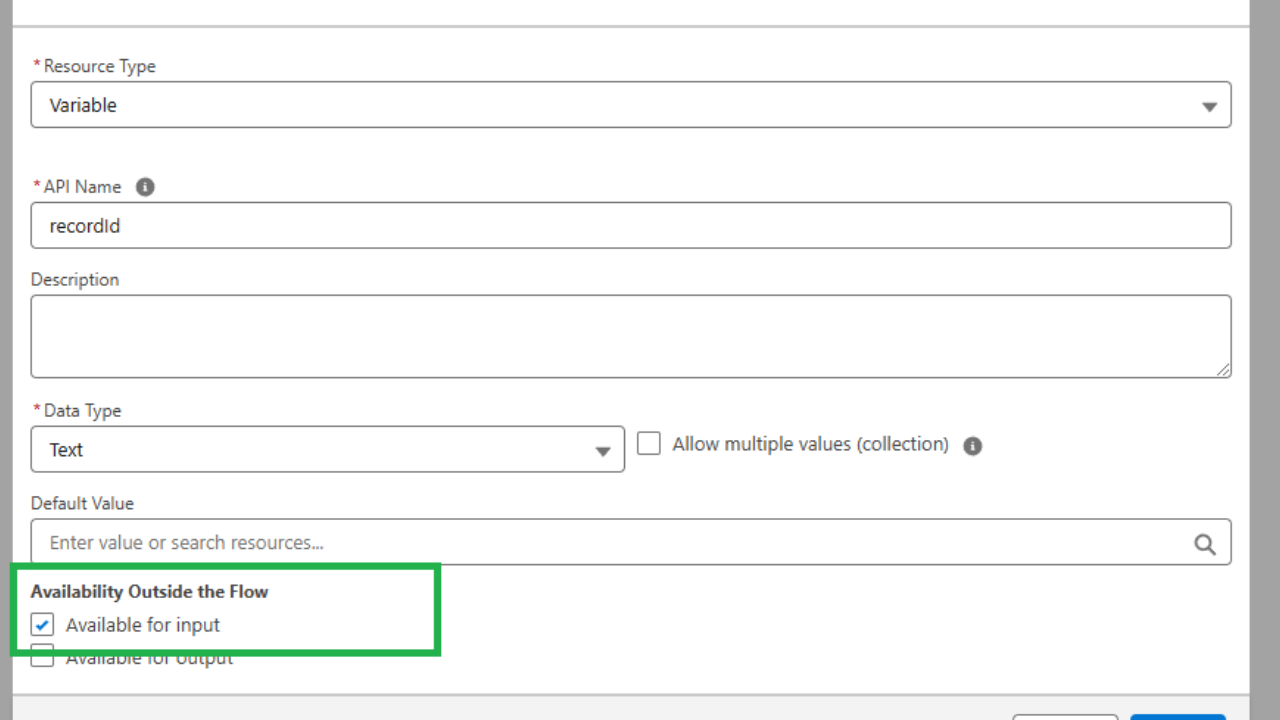
How to Get the Current Record Id in a Salesforce Screen Flow (Step-by-Step Guide)
Getting a Screen Flow to “know” which record it’s running on is a common challenge for new Salesforce Admins. You might be building a flow on a record page or launching one with a quick action, and you need the flow to pull in information about the current record – starting with its Id. The good news is Salesforce provides a built-in way to capture the record Id (and even the record’s data) in your flow. In this guide, we’ll walk through exactly how to get the current record’s Id in a Screen Flow, how to use it to fetch record details, and some best practices along the way. By the end, you’ll be confidently passing a record into your flows like a pro.
Why You Need a recordId Variable in Screen Flows
In Salesforce, Screen Flows often run in a record context – for example, placed on a Lightning record page or launched from a record’s action button. That means there is a “current record” the user is looking at when they run the flow. To make the flow aware of which record that is, we use a special input variable called recordId. Salesforce will automatically pass the current record’s Id into this variable when the flow starts (as long as everything is set up correctly). This recordId variable captures the Id of the record that initiated the flow, allowing you to use that Id inside your flow logic.
How does Salesforce know to do this? By convention, if your flow has an input variable named recordId, the platform recognizes it and will populate it with the Id of the relevant record (when the flow is launched from a record page, quick action, etc.). In other words, “recordId” is a special name – it must be spelled exactly recordId (case-sensitive) and marked as available for input. If those conditions are met, you can get the current record’s Id in your flow without any coding. This saves you from manually passing parameters or hard-coding Ids.
Now, let’s dive into the step-by-step process to set this up and use it in a Screen Flow.
Step-by-Step: Getting the Current Record in a Screen Flow
Follow these steps to configure your Screen Flow so it can access the current record’s Id and data. We’ll start with creating the recordId variable, then cover two approaches: using it as a text Id or as a full record variable. Don’t worry – we’ll explain which to use and why.
-
Create a
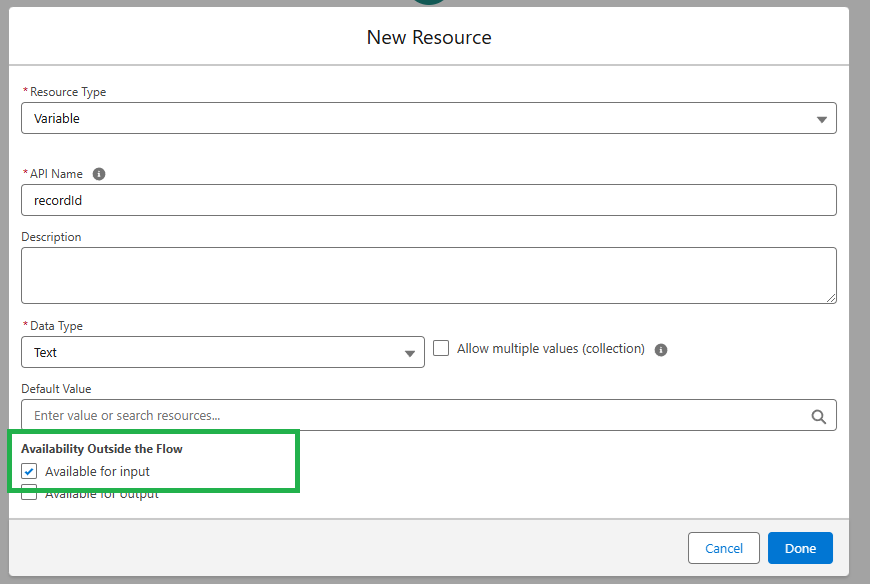
recordIdVariable in Your Flow: Open your flow in Flow Builder (make sure it’s a Screen Flow type). Go to the Manager tab and click “New Resource” to create a variable. Configure the variable as follows:-
API Name:
recordId(exactly this name). -
Data Type: You have two options here – Text or Record. For beginners, choosing Text is simple (it will hold just the Id string). If you choose Record, you’ll need to specify the Object (e.g. Account, Contact) so the variable can hold an entire record of that type. More on this choice in the next step.
-
Availability: Check Available for input. This is crucial – it tells Salesforce this variable can receive a value from outside (the record page or action). If you skip this, the flow won’t actually get the Id passed in!
Pro Tip: If you only need the record’s Id (and maybe a couple of fields), use a Text variable. If you need many fields from the record, use a Record variable. The Record variable option will automatically retrieve all the record’s fields for you, but it can be slightly less efficient if the object has a lot of fields you don’t actually use.
-
-
(Option A) Text
recordId– Get the Record’s Details: If you went with a Text variable forrecordId, your flow now has the Id but not the other fields of the record. To fetch details (like the record’s Name, Status, etc.), add a Get Records element to your flow. Set it up to query the object where Id equals{!recordId}(the variable). For example, if this flow runs on Account records, your Get Records would filter Account Id equals{!recordId}. This will retrieve the matching record from the database so you can use its fields in the flow. Store the result in a record variable (you can let Salesforce automatically store all fields). Now you have the current record’s data at your fingertips.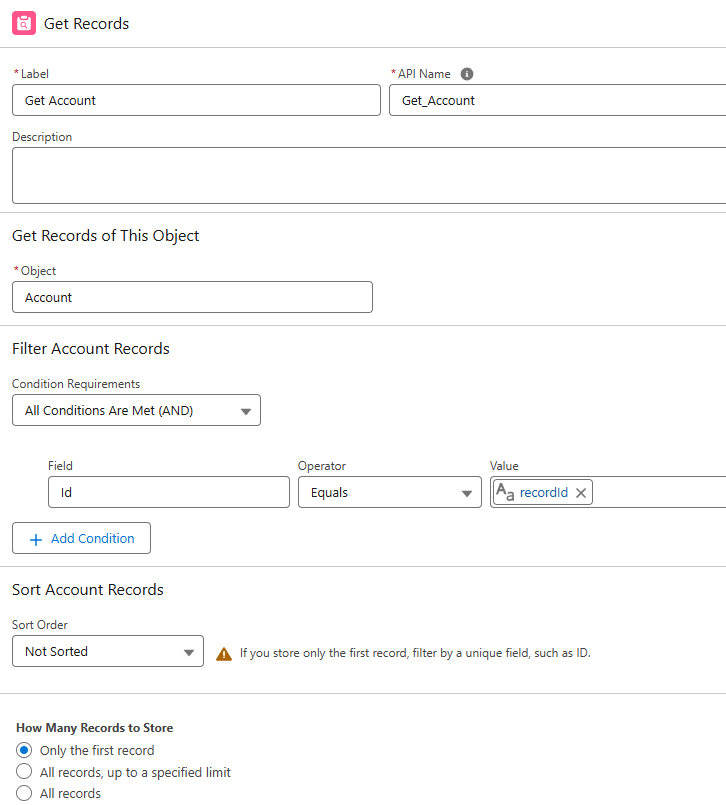
You can use the output from Get Records to reference any field of the record. For instance, if you queried Account, you might use the Account Name in a screen or make decisions based on the Account’s Status. (For a detailed walkthrough on using Get Records, see our step-by-step guide.)
-
(Option B) Record
recordId– Instant Record Access: If you definedrecordIdas a Record data type (with the object set to, say, Account), you don’t need a separate Get Records element. Salesforce will pass the entire record into that variable automatically. In our example,recordIdwould actually contain an Account record (not just an Id) as soon as the flow starts. You can then reference fields directly fromrecordIdin the flow (e.g.{!recordId.Name}for Account Name). This approach saves you an extra query and is very convenient when you need many fields from the current record. Just be mindful of the performance note above – if your object has dozens of fields but you only needed one or two, you’ve pulled a lot of unnecessary data. Otherwise, this is a super handy shortcut.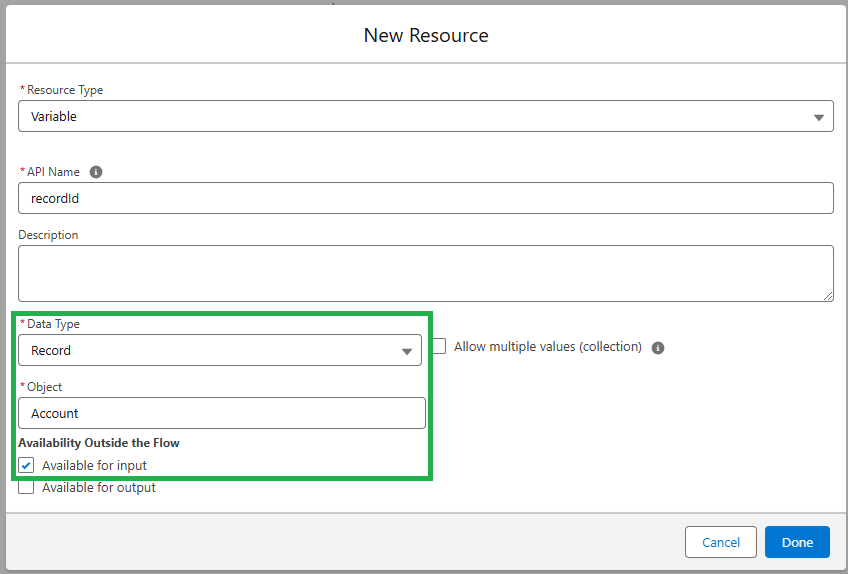
-
Use the
recordIdin Your Flow: Now that your flow has the current record’s Id (and possibly the full record), you can use it just like any other variable. Here are a few ideas:- Display information on a Screen: You can add a Display Text component to your flow screen and include the record’s fields. For example, show a welcome message like “You are updating {!recordId.Name} record” (if using the Record variable) or use the fields from the Get Records result. (Screenshot: Display Text component showing the current record’s Name)
- Make decisions based on the record: Use a Decision element to branch the flow depending on a field value of the current record. For instance, if
{!recordId.Status}is “Closed”, take one path, otherwise another.
- Update or create related records: You might pass the
recordIdinto another element. A common use case is an Update Records element where you update the record that the flow is running on (using the Id as reference). Or you could create a related record (e.g., create a Case and set its AccountId to the current record’s Id).
Essentially,
recordIdopens the door for your flow to interact with the specific record that’s in context. This makes your Screen Flow dynamic and context-aware, rather than a one-size-fits-all mechanism. -
Add the Flow to a Record Page or Launch it in Context: For the
recordIdmagic to work, the flow must be launched from a record context. Typically, this means either embedding the Screen Flow on a Lightning record page or launching it via an object-specific action (button). In both cases, Salesforce will handle passing in the Id as long as you set up things correctly:- Lightning Record Page: Add your flow to the page using the Flow component in the Lightning App Builder. In the component’s properties, check the box for “Pass record Id” (this maps the page’s record Id into your flow’s
recordIdvariable). Salesforce will then inject the Id when a user views that page. - Quick Action / Button: If you create a Lightning Action (on the object) that launches your Screen Flow, you don’t get a field to input the Id – Salesforce just does it for you. As long as your flow has the
recordIdinput variable defined, the platform automatically passes the current record’s Id into it when the action is invoked. No extra configuration needed! Just create the action, assign the flow, and you’re set.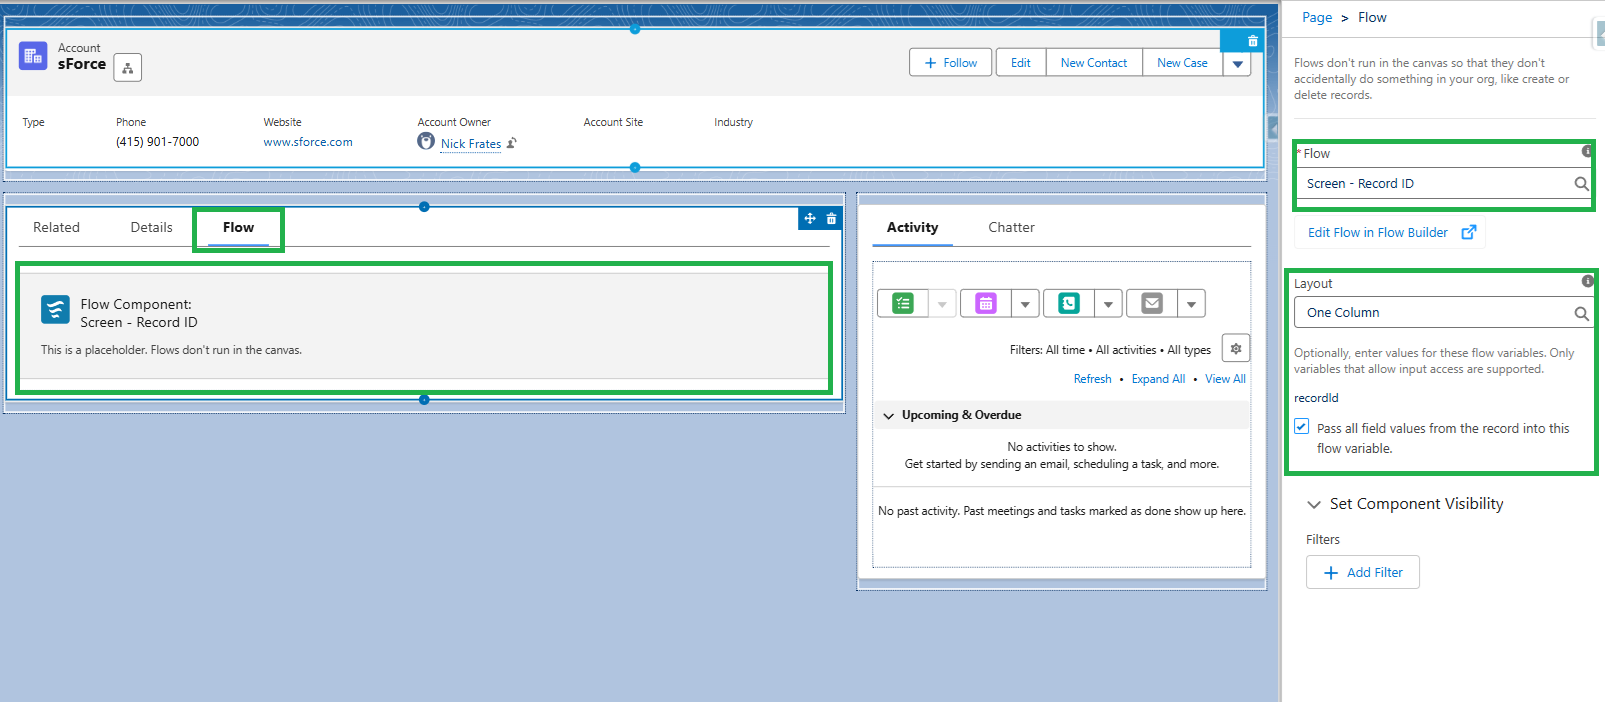
Troubleshooting: If you find your flow isn’t getting the Id (e.g.
recordIdis coming in blank when you debug), double-check that you marked the variable as input and that you’re launching the flow in one of the above ways. A Screen Flow run directly from Setup (or via Flow debug) doesn’t automatically have a record context – you’d have to provide an Id in the debug settings to simulate it. Also ensure the variable name is exactlyrecordId. Typos or wrong casing will break the auto-pass functionality. - Lightning Record Page: Add your flow to the page using the Flow component in the Lightning App Builder. In the component’s properties, check the box for “Pass record Id” (this maps the page’s record Id into your flow’s
Additional Tips and Best Practices
-
recordIdis Contextual: Remember thatrecordIdonly has a value when the flow is run from a record context (record page, action, or something like a related list). If you try to run the same Screen Flow from outside a record (for example, from the Flow detail page or utility bar without extra setup),recordIdwill be empty. Always plan to launch these flows in context or handle the scenario whenrecordIdis null (perhaps by showing a message to the user). Salesforce has even introduced a global variable$Flow.CurrentRecordthat represents the context record, but it only works when the flow is launched from a record page or related list. Using therecordIdinput variable is the tried-and-true method that won’t let you down. -
Case Sensitive Name: As mentioned, the variable’s API name must be exactly
recordId. For example,RecordIDorrecordID(capitalizations) will not work. Salesforce specifically looks for the lowercase "recordId" when passing the Id. Stick to that naming, and you’ll be golden. -
Mark as Input (Always): This bears repeating because it’s a frequent oversight – make sure to check Available for Input when creating the
recordIdvariable. Without it, the record page or action cannot feed the Id into your flow. If you forget, your flow will act like there is no current record. -
Use the Right Data Type: Decide between Text vs Record for
recordIdbased on your needs. If you only need a couple of fields from the record, using a Text Id + Get Records to fetch just those fields is a lean approach. If you need many fields or the whole record anyway, using a Record variable forrecordIdsaves you an extra Get step. Either way is fine – just balance convenience vs. performance. And remember, in Screen Flows you can always do a Get Records later if you realize you need more data. -
Test with Debug Mode: When you test your Screen Flow in Flow Builder’s debug mode, you can provide a sample record Id to simulate running on a record. This is a great way to verify that your
recordIdvariable is working. In debug, set “Run flow as if launched from” and paste in an Id (e.g., an Account Id) to test. If configured right, you’ll see that Id populate in your flow and any retrieved fields show up correctly.
Conclusion (Next Steps)
By now, you’ve learned how to grab the current record’s Id in a Screen Flow and use it to drive your flow’s behavior. With the recordId variable in your toolkit, you can build flows that adapt to whichever record the user is on, making your applications far more dynamic and user-friendly. No more hardcoding Ids or creating separate flows for each record – one flow can handle them all, contextually.
Ready to take your Salesforce Flow skills to the next level? As your personal mentor, I highly recommend deepening your expertise with structured learning. Check out my 2025 Salesforce Flows Course – an in-depth, project-based program that will turn you into a Flow expert. Enroll now in the Salesforce Flow course and supercharge your Salesforce automation skills!
(Happy Flow-building!)
Salesforce Saturdays
Join the Salesforce Saturday newsletter. Every Saturday, you'll get 1 actionable tip on Salesforce technology or career growth related to the Salesforce Industry.
We hate SPAM. We will never sell your information, for any reason.
