Before-Save vs After-Save Salesforce Flows: A Clear Guide for Beginners
Feb 12, 2025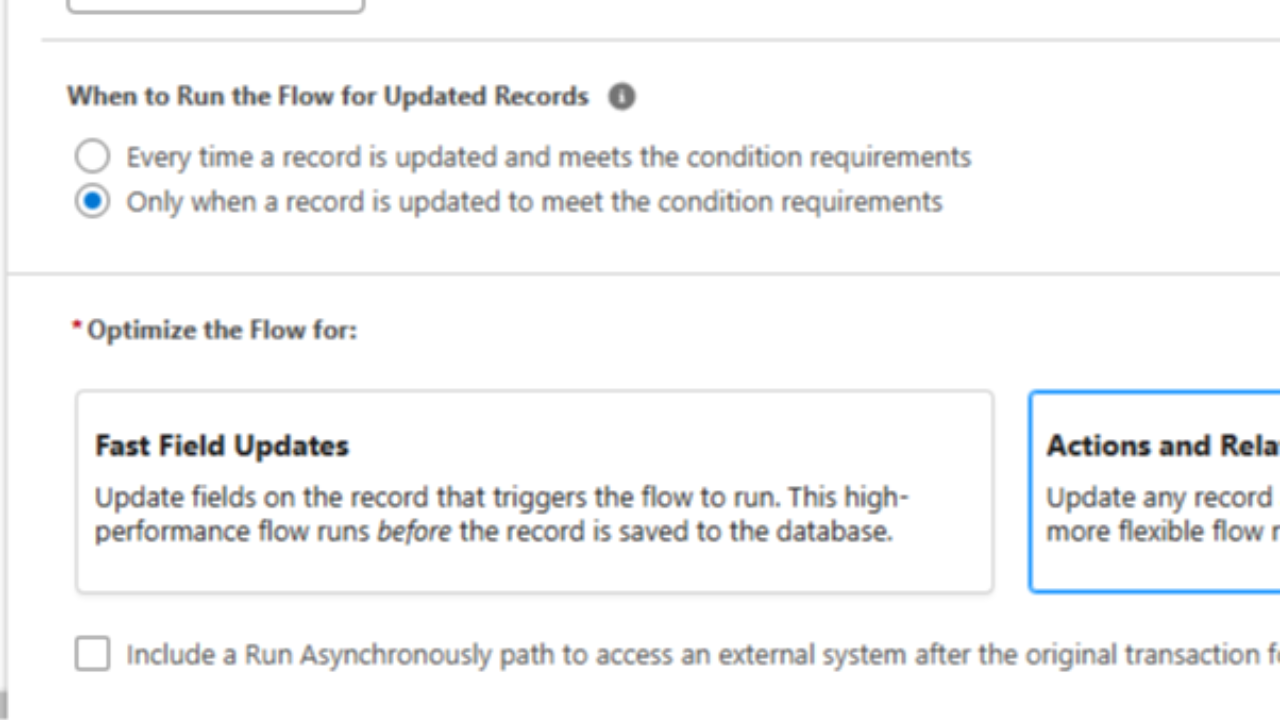
Before-Save vs After-Save Salesforce Flows: A Clear Guide for Beginners
If you’ve ever built a record-triggered flow in Salesforce and paused at the choice between “before-save” and “after-save,” you’re not alone. Many budding Salesforce admins and developers scratch their heads over which flow type to use. The good news? It’s simpler than it seems. This beginner-friendly guide will clear up the confusion between before-save and after-save flows and help you quickly decide which one is right for your needs. We’ll break down the key differences, show you when to use each type, and provide step-by-step tips so you can confidently choose the correct flow type every time.
Understanding Before-Save vs. After-Save Record-Triggered Flows
Record-Triggered Flows run automatically when a record is created, updated, or deleted (in certain cases) – much like Apex triggers, but with clicks not code. Salesforce gives you two options for timing your record-triggered automation: before-save flows and after-save flows. These are sometimes labeled in Flow Builder as “Fast Field Updates” (before-save) and “Actions and Related Records” (after-save). The names hint at their strengths: before-save flows are ideal for quick in-place field updates on the record that triggered the flow, while after-save flows let you perform additional actions like creating records, sending emails, or updating related records.
At a high level, the difference comes down to when the flow executes and what it can do:
-
Before-Save Flows run before the record is saved to the database. Think of this like a pre-processing step. Because they run pre-save, they execute blazingly fast – Salesforce experts often note they can be around 10x faster than after-save flows. They’re optimized for efficiency, but in exchange, they have a limited scope: they can only update fields on the triggering record (the record that initiated the flow). This is perfect for things like auto-populating fields or cleaning up data as soon as the user hits “Save.” However, before-save flows cannot create new records, send emails, or update related records – those actions require the record to exist in the database, which hasn’t happened yet in a before-save context.
-
After-Save Flows run after the record is saved. This means the record and its ID exist in the database when the flow executes. After-save flows are slightly “heavier” in terms of performance because Salesforce must commit the record first and then run the flow’s actions (and any changes the flow makes will perform additional database operations). The big benefit is flexibility: after-save flows can do almost anything – create or update other records (including related records), send email alerts or notifications, call subflows, post to Chatter, and more. If you need to perform actions beyond just updating the triggering record, an after-save flow is your go-to. In fact, most use cases that were traditionally handled by Process Builder (like triggering an email or a task after a record changes) are handled by after-save flows in Flow Builder today.
Key Differences at a Glance
To summarize the core differences between before-save and after-save record-triggered flows, here’s a quick rundown of their characteristics:
-
Execution Timing:
- Before-Save Flow: Runs before the record is saved to the database (similar to a “before trigger” in Apex).
- After-Save Flow: Runs after the record has been saved to the database (similar to an “after trigger”).
-
Performance:
- Before-Save: Ultra-fast and efficient. Since it runs pre-save, it avoids an extra database update. This means no additional save cycle – Salesforce doesn’t have to re-save the record, which skips extra processing like assignment rules or workflow rule re-evaluation. In practical terms, a before-save flow can execute very quickly (often cited around 10x faster than an after-save flow) and does not count against DML limits when updating the triggering record.
- After-Save: Slightly slower because any updates or actions it performs happen after the initial save, often requiring additional database transactions. Updates made in an after-save flow do consume DML operations. You won’t notice a small after-save flow being slow, but in bulk operations (or very complex flows), the difference in efficiency becomes important.
-
Allowed Actions:
- Before-Save: Can update fields on the triggering record only. In Flow Builder, before-save flows support a limited set of elements: Assignment, Decision, Loop, and Get Records (plus formula resources). You cannot use elements that perform separate actions like Create Records, Delete Records, or Send Email in a true before-save context. (In the Flow Builder’s Start configuration, choosing “Fast Field Updates” enforces these limits.)
- After-Save: Can perform all actions available in Flow Builder. This includes Create Records, Update Records (on any record), Delete Records, Send Email, Post to Chat, Launch Subflows, and even Scheduled Paths (time-delayed actions). In the Start configuration, selecting “Actions and Related Records” opens up the full toolbox of elements.
-
Use Case Examples:
- Before-Save: Auto-populating or correcting field values on the same record as it’s being saved. For example, setting a default value, formatting a text field, or checking a checkbox if certain criteria are met – all without needing additional records or user actions. It’s ideal for simple, quick data adjustments (like automatically capitalizing a name, or copying a value into a secondary field upon save).
- After-Save: Anything that needs to happen after the record exists. Common examples: creating a follow-up Task after a new Opportunity is closed, sending an email notification when a case is updated, updating all child records when a parent record changes, or logging a record change to a history object. If your flow needs to reference the record’s ID (for example, to pass it into a subflow or include it in an email), you’re in after-save territory because the ID is only available post-save. After-save flows are basically the declarative way to handle what you might otherwise do with Apex after triggers or the (now legacy) Process Builder.
When to Use Before-Save Flows (Fast Field Updates)
Choosing a before-save flow makes sense when your automation only needs to affect the record that triggered the flow, and no further actions are required. Here are some clear-cut scenarios where a before-save flow is the perfect choice:
-
Updating Fields on the Triggering Record: If all you need is to set or modify some field values on the record as it’s being saved, use a before-save flow. For example, when a Lead is created, maybe you want to automatically set a “Source Category” field based on the Lead Source, or when an Opportunity’s Stage changes to Closed Won, you want to stamp a “Closed Date” field with today’s date (if it isn’t already populated). These kinds of in-place field updates are exactly what before-save flows excel at. They happen in-memory before the save, so Salesforce saves the record once with your changes already applied – no extra update needed.
-
Performance is Critical (High Volume): Because before-save flows are so efficient, they are ideal for high-volume changes. If your org often processes lots of records at once (data loads, bulk updates, etc.), doing simple field updates in a before-save flow helps avoid hitting governor limits. You skip the additional DML operation that an after-save flow would require for the same field change. In fact, field updates in before-save flows do not count against the DML limits at all, since they don’t perform a separate update operation – it’s just part of the initial save. This means you can update thousands of records’ fields with a before-save flow without consuming one of your allowed 150 DML statements in that transaction.
-
No Need for IDs or Related Records: If your logic doesn’t require knowing the record’s Salesforce Id (for example, you’re not creating related records or logging anything using that Id), then a before-save flow is sufficient. Also, if you don’t need to touch any other object or send any notifications, keep it simple and stick with before-save.
Example Use Case (Before-Save): Suppose whenever an Account is created, you want to set a custom field “Account Score” based on some criteria (say, increase the score if certain fields are filled out). You don’t need to create any other records or send emails – just update a field on that new Account. A before-save flow would be ideal here: it can calculate the score and assign it to the Account before it gets saved, so the saved record already has the correct score. This will be faster and more governor-limit-friendly than doing it after save.
How to Configure a Before-Save Flow:
Even if you’re a beginner, setting up a before-save flow is straightforward. Here’s a quick step-by-step to configure one:
- Create a New Flow: Go to Setup -> Flows, click New Flow, and select Record-Triggered Flow.
- Choose Object and Trigger: Select the object that will trigger the flow (e.g., Account, Contact, Case, etc.), and specify when it should run (on create, or update, or both). You can also set entry conditions if the flow should only run for certain record criteria.
- Optimize for Fast Field Updates: In the Trigger setup, you’ll see an option for “When to Run the Flow.” Choose “Fast Field Updates”, which is Salesforce’s way of saying “run this flow before the save.” This setting ensures the flow runs as a before-save flow.
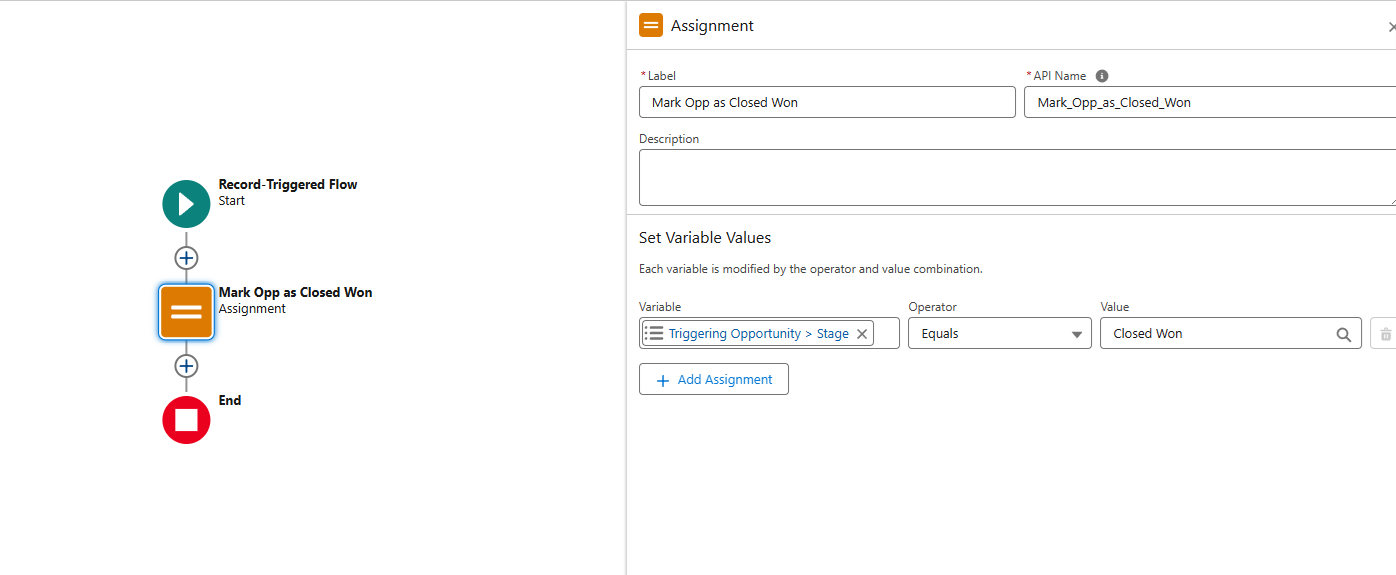
- Build Your Logic with Assignment (or Decision) Elements: In the flow canvas, use an Assignment element to set new values for fields on the
$Record(the record that triggered the flow). For example, assign$Record.Account_Score__c = 5(or whatever logic you need). You can use a Decision element if you only want to update the field under certain conditions. Note: You won’t even see options like “Create Records” or “Send Email” – those are intentionally unavailable in a before-save flow. - Save & Activate: Save the flow, test it, and activate it. Now whenever a record meeting your criteria is saved, your flow will run before the database write, seamlessly updating the field.
When to Use After-Save Flows (Actions and Related Records)
An after-save flow is the right choice when your automation needs to do more than just edit the triggering record. Essentially, if your flow’s job description goes beyond “update some fields on this record,” you’ll likely be in after-save territory. Consider using an after-save flow in scenarios like these:
-
Creating or Updating Related Records: This is one of the most common needs for after-save flows. For instance, when a new Opportunity is closed, you might want to automatically create a related Task to follow up with the customer, or update all related Contacts when an Account’s status changes. You can’t do that in a before-save flow (which can’t create records), but an after-save flow is built for it. Example: When an Account is marked “Inactive,” an after-save flow could loop through all related Contacts and mark them “Inactive” as well. (We’ve written a detailed tutorial on how to update child records with an after-save flow – check it out for a real-world example of after-save in action.)
-
Sending Emails or Notifications: If your process involves sending an email alert, a Slack message, or a push notification, you’ll need an after-save flow. For example, you might want to send a welcome email to a new lead immediately after their record is created, or trigger an email to a support agent when a high-priority case is updated. After-save flows can use the Send Email action or even invoke email alert configurations. Before-save flows can’t send emails because, again, they’re limited to just field updates.
-
Accessing the Record’s ID or System-Generated Values: Sometimes your automation needs the record’s unique ID (perhaps to pass to another process or use in a link) or other fields that Salesforce populates only after saving (like Last Modified Date, Created Date, or formula fields that calculate upon save). In a before-save flow, those values aren’t available yet. But in an after-save flow, they are. For example, if you want to log an entry in a custom “Change Log” object with the record’s ID and timestamp whenever a record changes, you must use after-save.
-
Using Scheduled Paths (Delays): Salesforce Flow allows after-save flows to have Scheduled Paths, meaning you can perform actions a certain time after the trigger event. For example, when a case is created, you might want to send a follow-up email after 3 days if the case is still open. This delay feature only works in after-save flows, since the flow needs to wait after the initial save event. Before-save flows execute immediately and cannot have time-based actions.
-
Delete Triggers: Worth noting – Salesforce record-triggered flows currently do not support “after-delete” events. You can create a flow that triggers on record deletion, but it will actually run as a before-delete flow (since once the record is deleted, you can’t act on it after the fact). In deletion scenarios, if you need to perform actions when a record is deleted (like cleaning up related records), Salesforce will treat that as a before-save (before delete) flow under the hood, giving you the full range of actions. So for deletes, just remember: you’ll configure it as a record-triggered flow on delete, and you will have create/update/delete elements available (it’s an exception where before-delete behaves like after-save in terms of available elements).
Example Use Case (After-Save): Imagine whenever a Deal (Opportunity) is closed, you want to automatically create a set of follow-up tasks: one task for Finance to send an invoice, another task for an Account Manager to check in after 30 days, and maybe post a congratulatory message to a Chatter group. This requires multiple actions across different related records (Tasks, Chatter posts) and even a scheduled action (the 30-day follow-up). A single after-save flow can handle all of this: it can create the Task records, post to Chatter, and use a Scheduled Path to create the 30-day follow-up task later. Trying to do any part of this in a before-save flow would be impossible – you need the after-save capabilities here.
How to Configure an After-Save Flow:
Setting up an after-save flow is quite similar to before-save, with a couple of differences in the options you select:
- Create a New Flow: Go to Setup -> Flows, New Flow, and choose Record-Triggered Flow (just like before).
- Choose Object and Trigger Conditions: Pick your object (e.g., Opportunity) and when it should trigger (on create, edit, etc.). Add any entry conditions if needed (e.g., Stage = Closed Won).
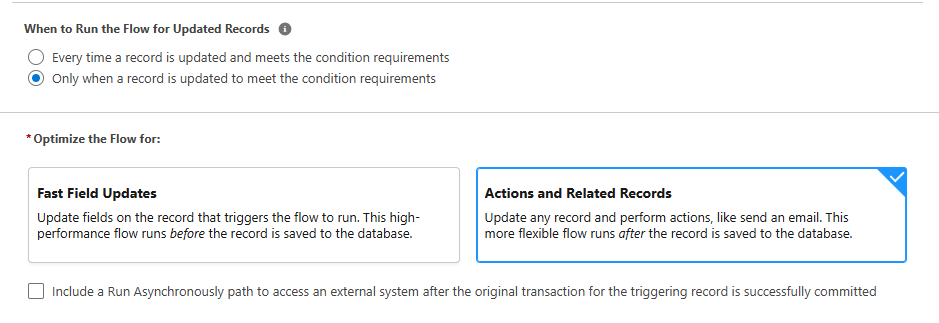
- Optimize for Actions and Related Records: In the start configuration, choose the option for “Actions and Related Records”. This ensures the flow will run after the record is saved and allows you to use all action elements. (If you’re in a newer Salesforce version, this is the default for most record-triggered flows; in older versions it was explicitly labeled as after-save.)
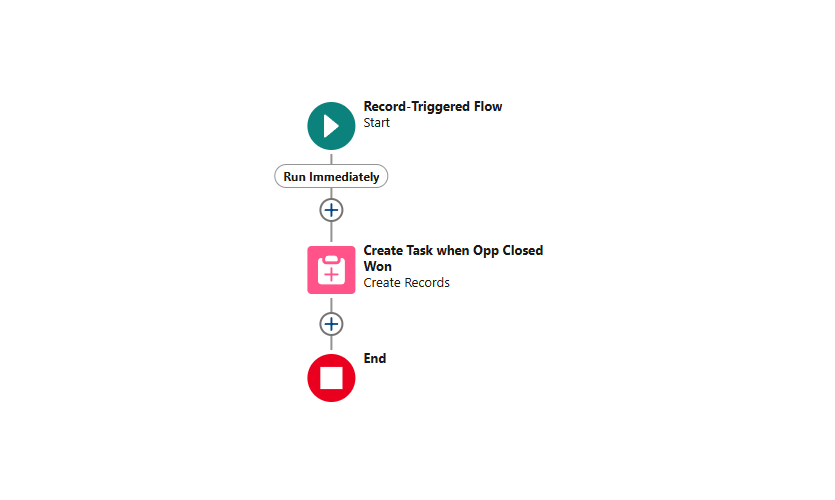
- Build with Action Elements: Now you can drag and drop Create Records, Update Records, Send Email, Launch Subflow, Delete Records, etc., as needed. Design your flow according to what you want to accomplish. For example, use a Get Records to find related records to update, then an Update Records element to change them. Or use a Create Records element to make a new Task. You can also still use Assignment and Decision elements to handle logic, just like any flow. The key is: you’re not limited, so make sure to use those powers responsibly (only include necessary actions to avoid performance issues).
- Test & Activate: Because after-save flows can do a lot, always test your flow with sample data (Flow Builder has a debug mode) to ensure it behaves as expected. Then activate it. The flow will run after Salesforce saves the record, carrying out your actions.
How to Choose the Right Flow Type (Step-by-Step Decision Guide)
Still not sure whether your scenario calls for a before-save or after-save flow? Use this simple decision guide to choose the correct flow type:
-
Identify What Your Flow Needs to Do: Start by clearly listing what you want the automation to accomplish. What’s the end goal? For example: “When a Contact is created, I want to populate a custom field and create a follow-up Task.” Understanding the requirements is key. (Pro tip: Writing this out will often hint at whether you need additional actions or just a field update.)
-
Ask: “Am I Only Updating Fields on the Triggering Record?” If the answer is yes – the flow’s job is only to update some fields on the record that triggered it (and nothing else) – then lean towards a before-save flow. This will handle your use case and do it with maximum efficiency. If the answer is no – you need more than just updating the triggering record – proceed to the next question.
-
Do I Need to Create/Update Other Records, Send Notifications, or Perform Complex Logic? If yes, you need an after-save flow. Any requirement like creating related records (e.g., Tasks, child records), updating other records in the system, sending out an email or notification, or calling a subflow means you’re squarely in after-save territory. Use after-save so you have the full toolbox of actions at your disposal. (If no, and you truly only update the same record, then a before-save is likely sufficient as determined above.)
-
Do I Need the Record’s ID or Other Post-Save Values? Some flows might not explicitly create other records but still need info that’s only available after a save. For example, if you need to use the record’s Id (maybe to pass to an external system or include in an email link), or you need to check a formula field’s value that calculates on save, those are clues that you should use an after-save flow. Before-save flows happen too early to get those values.
-
Consider Performance and Best Practices: If both a before-save and after-save flow could achieve the result (for instance, you could update the same record’s field using either type: before-save with an Assignment, or after-save with an Update Records element), default to before-save for the better performance. It’s generally a best practice in Salesforce Flow to do the minimum work necessary in the earliest possible phase. Why put extra load on the system with an after-save update if a no-impact before-save update will do? This helps keep your automations lean and less error-prone. (For more tips on building efficient flows, check out our Salesforce Flow Best Practices.)
-
Use Both Types if Needed (Advanced Tip): Sometimes the best solution is combining both: a before-save flow to handle field updates on the record, and an after-save flow to handle additional actions. Salesforce will execute the before-save flow first, make the field changes, then save the record, then execute the after-save flow. By splitting logic this way, you get the speed benefits and ensure you’re using each flow type for what it does best. For example, on an Opportunity update, you might use a before-save flow to immediately calculate and stamp a “Last Stage Change Date” field (fast update), and an after-save flow to send an alert to the team if the Opportunity was marked as Closed Won (needs email action). Designing your flows this way (one before, one after per object) is a common pattern for keeping automations organized and efficient.
By following the steps above, you should be able to determine the right approach for any given scenario. When in doubt, remember this rule of thumb: Use a before-save flow for speed and simplicity, and an after-save flow for power and capability. If you stick to that guideline, you’ll rarely go wrong.
Conclusion & Next Steps
Understanding the difference between before-save and after-save flows is a game-changer for anyone working with Salesforce automation. By using the right type of flow, you ensure your solution is not only correct but also efficient. No more trial-and-error or confusion – you now have a clear framework for deciding which flow type to use for any record-triggered automation need.
With this knowledge, you’re well on your way to building smarter, faster flows. But this is just the beginning of what you can do with Salesforce Flow!
Ready to Become a Salesforce Flow Pro? If you’re excited to take your Flow skills to the next level, there’s no better way than hands-on learning with expert guidance. Imagine being able to build any automation you need – and doing it the right way the first time. To get there faster, consider joining our Salesforce Flow course designed for professionals just like you.
Next Step: Master Salesforce Flows & Level Up Your Career
Finally – a simple, proven way to become confident with Salesforce Flows even if you’re starting from scratch. The 2025 Salesforce Flows: Complete Course is a step-by-step program created by Nick Frates. In this course, you’ll learn to build flows from the ground up, tackle real-world scenarios, and apply best practices used by top Salesforce professionals. No fluff, no endless documentation – just clear, structured lessons that turn you into a Flow superstar. By the end, you’ll be automating complex business processes with ease, impressing your team and even future-proofing your career in the Salesforce ecosystem. Opportunities in Salesforce are booming – don’t get left behind. Enroll now in the Salesforce Flows course and unlock the skills that will make you the go-to Salesforce Flow expert at your organization. Your future self (and your current or next boss!) will thank you.
Salesforce Saturdays
Join the Salesforce Saturday newsletter. Every Saturday, you'll get 1 actionable tip on Salesforce technology or career growth related to the Salesforce Industry.
We hate SPAM. We will never sell your information, for any reason.
