How to Automatically Update Child Records with Salesforce Flow
Feb 09, 2025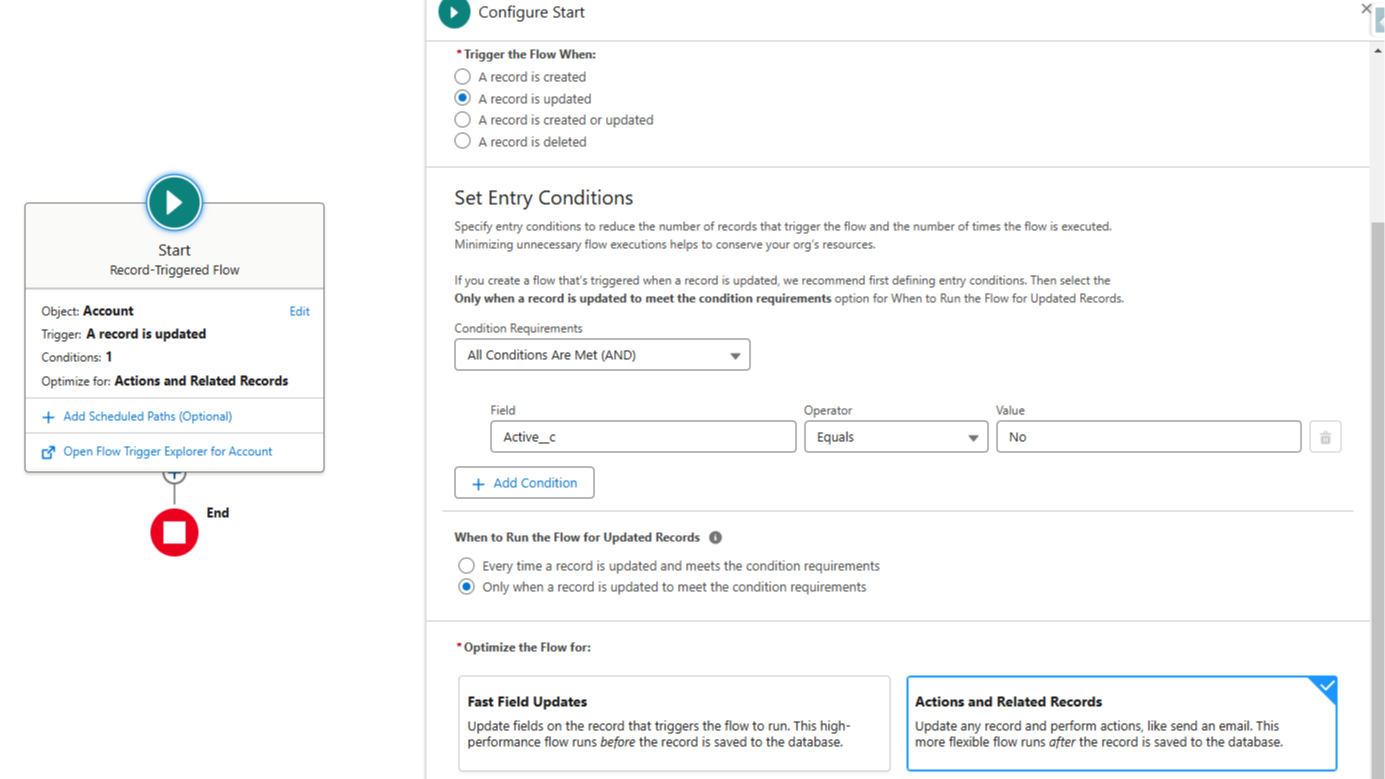
Objective: Solve a common Salesforce Flow problem – automatically updating all child records when a parent record is changed – with a step-by-step, beginner-friendly solution. This tutorial uses a record-triggered Flow (after-save) to update related records.
Introduction
Have you ever needed to ensure that when a parent record updates, all its related child records update too – without manual effort? For example, if an Account’s status changes, you might want to update all related Contacts, or when an Opportunity is closed, update all related Opportunity Products. In Salesforce Flow, this can be achieved easily with a Record-Triggered Flow. In this guide, we’ll walk through an example: when an Account’s “Active” field changes to “No,” automatically set all related Contact records to “Inactive.” This solution requires no Apex code and can be done with just clicks using Flow Builder.
Why this is useful: By following these steps, you’ll solve an immediate automation need and ensure your data stays in sync – a big win for admins looking to work smarter, not harder!
Step 1: Identify the Trigger and Related Records
First, clarify the requirements:
- Trigger Object: The parent object that, when changed, will trigger the flow. (In our example, Account).
- Trigger Condition: The specific change or criteria on the parent that should cause the update. (E.g., Account “Active” field changed from Yes to No).
- Target Object: The child records that need updating. (E.g., Contacts related to the Account).
In our scenario:
- When an Account is marked not active (
Active = "No"), - Then all Contacts linked to that Account should be updated (we’ll set a Contact field “Inactive__c” to true, for instance).
Having this clear will help configure the flow correctly.
Step 2: Create a Record-Triggered Flow
-
Navigate to Flow Builder: In Salesforce Setup, type “Flows” in the Quick Find and click Flows. Click New Flow.
-
Choose Flow Type: Select Record-Triggered Flow and click Create. We use a record-triggered flow because we want the automation to run automatically when a record changes (in this case, an Account).
-
Configure the Trigger: In the Start element that appears:
-
Set Object to Account.
-
For Trigger condition, choose “A record is updated” (since we care about changes to existing accounts).
-
Under Entry Conditions, define
Activefield Equals “No”. This ensures the flow runs only when an Account is set to not active. -
Choose When to Run the Flow: Select Only when a record is updated to meet the condition requirements. We choose this so that the flow runs only when the account is updated to meet the condition for the first time.
- Ensure Optimize the Flow for: is set to Actions and Related Records (this is the default for after-save in newer Salesforce versions; older UI labels called this “after save”). This setting confirms we can interact with related records in this flow.
- Why after-save? After-save flows run after the Account is saved to the database, which means we can safely perform actions on other records. Salesforce documentation notes that before-save (fast field updates) flows are limited to updating the same record, whereas after-save (actions and related records) flows can perform additional actions like creating or updating related records.
Now our flow will trigger at the right time: whenever an Account becomes inactive, the flow will fire after that change is saved.
-
Step 3: Update Related Child Records
Now we need the flow to gather all related Contacts of the Account:
-
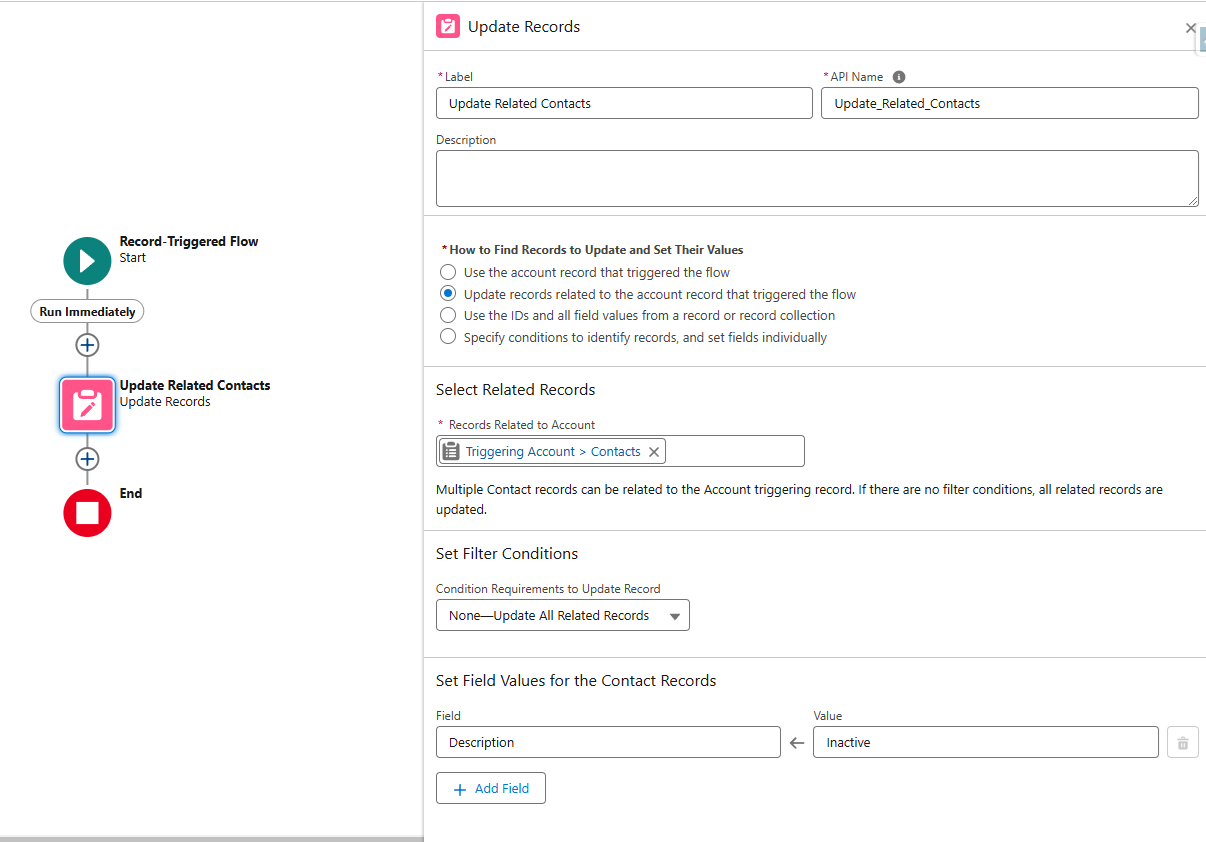
On the flow canvas, click + Add Element and select Update Related Records.
-
Label it something like “Update Related Contacts” In the Update Records configuration:
- How to Find Records to Update and Set Their Values: Update records related to the account record that triggered the flow
- Select Related Records: Triggering Account > Contacts
- Filter Conditions: None—Update All Related Records
-
Set the Field Values to update:
- Field: “Inactive__c” (or a similar checkbox/field on Contact that denotes inactive status like Description__c).
- Value:
True. (Or set to the appropriate value/checkbox indicating the contact is inactive or should be closed out. If using a Text or Picklist field, set the value accordingly, e.g., Status = “Inactive”).
-
Save the Update Records element. This single element will iterate through the Contact collection and update each Contact’s field as specified.
(Behind the scenes, Flow bulkifies this action – it’s one transaction updating multiple records, which is efficient. As a best practice, avoid updating records one-by-one in a loop if a single bulk update can do the job.)
If we needed more complex logic per record, we could drag a Loop element to iterate over each Contact, use Assignment elements inside the loop to set values conditionally, then use a second Update Records element to save the changes. But for this straightforward field update, the single update on the collection is the cleanest solution.
Step 4: Test the Flow
Before activating, it’s crucial to test the flow to ensure it works as expected (and only updates what it should):
-
Test in Debug Mode: Click the Debug button in Flow Builder. Provide test input by selecting an Account record (you can choose an Account that has some Contacts). Simulate changing the Account’s Active field to “No” in the debug run. The debug logs will show if the flow retrieved the contacts and updated them. Verify that the “Update Related Contacts” step executed and how many records were updated.
-
Activate the Flow: If the debug results look good (no errors, and the intended updates showed up), click Activate. The flow will start listening for real record changes.
-
Live Test: Go to a real Account record in Salesforce (preferably in a Sandbox or test environment). Change the Active field from Yes to No (or whatever the trigger condition is) and save. Then, check the related Contacts for that Account – each Contact’s Inactive field (or whatever you chose) should now be set to True (or updated accordingly). You might need to refresh the record page to see the changes.
-
Optionally, test a negative case: change an Account that has Active = Yes (or doesn’t meet criteria) and ensure the flow does not fire. This confirms your entry condition is specific enough.
Step 5: Deploy and Monitor
Once tested, your flow is effectively automating the child record updates. Keep an eye on it initially:
- Use the “Paused and Failed Flow Interviews” section in Setup to see if any executions failed (e.g., due to permissions or data issues).
- Ensure users have permission to the fields being updated. (In our example, if a user triggers the Account change, the flow runs in system context, so it usually can update child records regardless of user’s rights – but if using a screen flow or other scenarios, be mindful of permissions).
This flow will now save your team time and prevent data inconsistencies. No more manually updating each related record – it’s all handled automatically!
Tips and Best Practices
- Bulk Considerations: The approach shown (Update Records) is bulk-safe. If someone mass-updates Accounts (via Data Loader, for instance), the flow will handle batches up to the limit without hitting governor limits. We’re using one SOQL (to get contacts) and one DML (to update them) per flow run, which is efficient.
- Selective Updates: We updated all child contacts unconditionally. If you need conditional logic (e.g., only update contacts that meet certain criteria), you could add filters in the Update Records (for example, only get Contacts where
Status != "Inactive"to avoid redundant updates). - Avoid Recursion: The flow updates Contacts but not Accounts, so we won’t retrigger itself. Be careful in flows that update the same object that triggered them (you may need a condition to prevent infinite loops).
- Documentation: Add a description to your Flow and elements so future admins know what it’s for (e.g., “This flow deactivates contacts when an account is deactivated”).
Conclusion and Next Steps
You’ve now built a Salesforce Flow that keeps parent-child data in sync automatically. This “update child records” pattern can be applied to many scenarios (Opportunities → Opportunity Products, Campaigns → Campaign Members, etc.). With each Flow you build, you’re replacing what might have been tedious manual work with effortless automation.
If you found this tip useful, imagine what else you can do with Salesforce Flow with the right guidance. From complex approval processes to integrating external data – Flow can do it all with clicks.
Call to Action: Ready to become a Salesforce Flow expert? 🚀 This tutorial is just the beginning. To dive deeper and learn pro-level Flow techniques, best practices, and real-world project examples, check out my Salesforce Flow course. The course, Salesforce Flows: The Complete Guide, has helped thousands of professionals automate business processes like a rockstar. Enroll now and take your Salesforce skills to the next level!
Your journey from Flow beginner to automation champion starts today – see you in the course! 🙌
Salesforce Saturdays
Join the Salesforce Saturday newsletter. Every Saturday, you'll get 1 actionable tip on Salesforce technology or career growth related to the Salesforce Industry.
We hate SPAM. We will never sell your information, for any reason.
