Salesforce Flow Error Handling 101: Fault Paths Explained
Feb 12, 2025
Ever run a Salesforce Flow and see the dreaded “An unhandled fault has occurred in this flow” error? 😱 This vague message strikes fear into admins and confusion into users. It basically means something went wrong in the Flow, but Salesforce isn’t telling you what. The Flow stops dead, the user is left baffled, and as the admin you likely get an error email with cryptic details.
Good news: you can prevent these ugly surprises by implementing Flow Fault Paths (Fault Connectors) for error handling. In this guide, we’ll demystify fault paths and show how to catch Flow errors gracefully using fault connectors and the $Flow.FaultMessage variable. You’ll learn to display user-friendly error messages and notify your team, ensuring failed flows are handled smoothly instead of crashing and burning. Let’s dive in!
What Are Fault Paths in Salesforce Flow?
Fault Paths (also called fault connectors) are special paths in a Flow that run when an error occurs. Think of a fault path as an “error-handling branch” for your Flow. Certain elements in Flow (like record creates, updates, deletes, or Apex actions) can fail – for example, a “Create Records” might violate a validation rule or a user might lack a field permission. Normally, such failures throw an unhandled fault (the Flow’s equivalent of a runtime error). But if you connect a fault path from that element, the Flow will go down that alternate path instead of just blowing up.
In Flow Builder, fault connectors appear as dashed red lines from Data or Action elements. You connect a fault path to other elements just like a normal connector. Any elements you connect a fault path to will execute only if the previous element fails. (Tip: You usually need at least one normal outgoing path first before you can drag a second connector for the fault.) Essentially, you’re telling Salesforce: “Try to do X, but if there’s an error doing X, then do Y instead.”
Why use fault paths? A few big reasons:
- No more generic errors for users: Instead of Salesforce’s generic error popup, you can show a helpful message. This massively improves user experience by providing context or instructions, rather than a scary “contact your admin” note.
- Custom error notifications: With fault paths, you decide how to alert the team. Maybe send yourself (and other admins) an email or Slack message with details. You could even create a record log of the error. You’re not limited to Salesforce’s default error email routing.
- Graceful recovery: In some cases, you can guide the user to fix the issue and continue. For example, if a required field was blank and caused an error, a fault path could display “Oops, we couldn’t create the record because a required field was missing. Please fill in all fields and try again.” This is much better than the Flow just failing with no direction.
- Maintain flow integrity: By handling exceptions, you prevent the entire Flow (or transaction) from crashing unexpectedly. Your Flow can cleanly roll back changes or take alternate actions, which leads to more robust automation.
In short, fault paths are your Flow’s safety net. Next, let’s walk through how to set them up step by step.
How to Set Up Fault Paths for Flow Error Handling
Setting up fault handling in a Flow is straightforward. Here’s a step-by-step example of using fault connectors to catch errors:
1. Identify error-prone elements: First, pinpoint where your Flow might fail. Common culprits are Data elements like Create Records, Update Records, Delete Records, or external actions (like Apex invocations or subflows). These elements get a fault connector option because they can throw exceptions. For instance, a “Create Records” for Contacts could fail if a required field (say, Phone) is blank or a validation rule kicks in. Jot down which elements in your Flow need error handling.
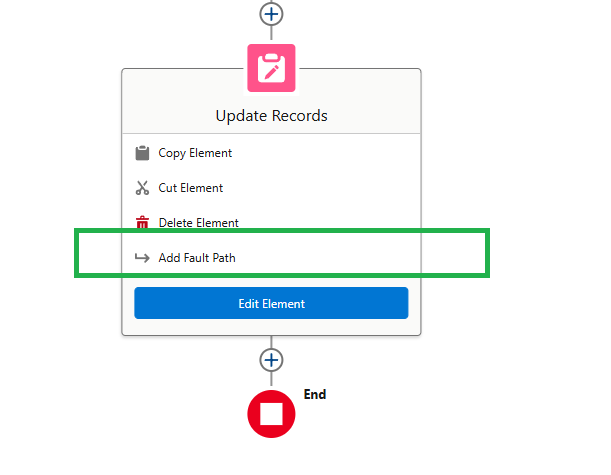
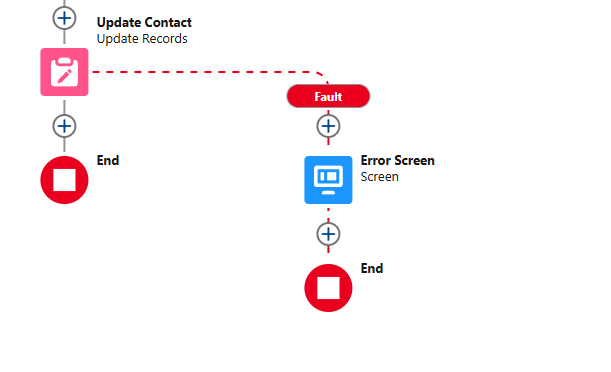
2. Add a Fault Connector: Open your Flow in Flow Builder. After you’ve connected the normal path from your element, add the fault path. Click the data element and select Add Fault Path. This will create a new path in the flow, and this is your Fault Path.
3. Decide what the Fault Path should do: Now choose how you want to handle the error. You have a few options for the element that the fault path leads to:
-
👉 Display a user-friendly error (Screen Flow): If this is a Screen Flow (one that interacts with a user), you can route the fault to a Screen element. On that screen, add a Display Text component that shows a nice message instead of a confusing error code. For example: “Oops, something went wrong. Please correct any invalid values and try again.”
You can even include the actual error details for reference, e.g. “Error Details: {!$Flow.FaultMessage}”. Using$Flow.FaultMessagewill output the system error message that Salesforce generated when the element failed. Often, that message might read like “FIELD_CUSTOM_VALIDATION_EXCEPTION: Phone: Phone number is required” (if a validation rule caused the failure). That’s not super pretty to show a user verbatim. A better approach might be to rephrase it or just inform them of the high-level issue. In our example, you could display “Phone number is required – please enter a value.” and maybe log the technical fault message elsewhere. The key is you’re catching the error and showing your own message on screen, so the user isn’t stuck or scared.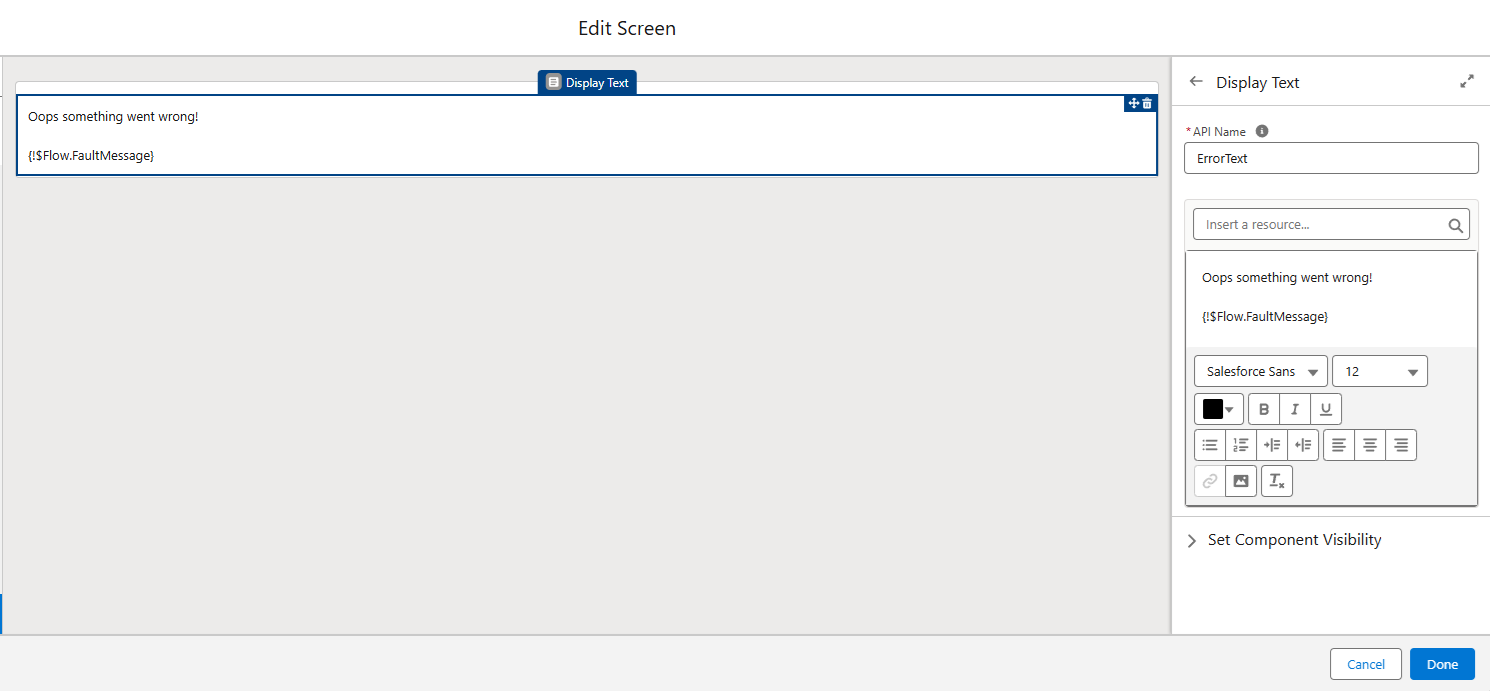
-
👉 Send an alert or do a rollback (Autolaunched Flow): If your Flow runs in the background (e.g. a Record-Triggered Flow or Scheduled Flow), the user won’t see a screen. In these cases, use the fault path to notify admins or perform cleanup. A popular method is to use an Email Alert or Send Email action. For example, add an Action element on the fault path that sends an email to your support/admin team. In that email’s body, include useful info: which Flow hit an error, what the error was, which record/user triggered it, etc. You can merge in the
$Flow.FaultMessagevariable to give the exact error details. This way, when a Flow fails at 2 AM, you get an email like: “Subject: Flow Error in Update Account Flow. Body: Error occurred on 2025-02-12 14:25:03 by user John Doe. Error: FIELD_CUSTOM_VALIDATION_EXCEPTION: Phone: Phone number is required.” – and you’ll know exactly what happened.
You aren’t limited to emails either; you could post to a Chatter group, send a Slack notification (via webhook), or even create a custom “Error Log” record in Salesforce to track all flow errors. The idea is to catch the error and alert the right people behind the scenes. (Advanced tip: By handling errors with fault paths, you can even notify multiple recipients or log extra data, which the standard Flow error emails can’t do easily.) -
👉 Alternative recovery logic (conditional): In some scenarios, you might use the fault path to take a corrective action automatically. This is less common, but imagine an external API call fails – you could use the fault path to call an alternate service, or if a record create fails, maybe attempt a different create with default values. This really depends on your use case. Most of the time, you’ll either inform the user or notify admins, as described above.
4. Leverage $Flow.FaultMessage (but wisely): The $Flow.FaultMessage variable is your friend for debugging. It captures the raw error message thrown by the failed element. You can reference this in any fault path element (like in the Display Text on a screen, or in an email’s text template). This is super helpful to include in notifications because it tells you exactly what went wrong (e.g. “DUPLICATE_VALUE: a record with this ID already exists” or “FIELD_INTEGRITY_EXCEPTION: Amount must be a positive number”).
However, for end-users, this message might be too technical. Feel free to show it for an internal user audience, but for general users you might want to sanitize or simplify it. Some admins choose to parse the fault message with a formula to extract just the meaningful part (for example, stripping out “FIELD_CUSTOM_VALIDATION_EXCEPTION:” and just showing the validation rule text). Simpler yet, you can have a generic user message and only log the full $Flow.FaultMessage privately. The bottom line: include $Flow.FaultMessage in some way so you or the support team can see the real error, even if you hide it from the end user.
5. Test the fault path: After setting up, run your Flow in a scenario that will trigger the error to make sure your fault handling works. Intentionally cause the failure – e.g. leave the phone blank to trip the validation rule in our Contact example. When you run it, verify that your fault path executes: the user should see your custom error screen (and no scary Salesforce error), or you should receive the notification email you configured. If nothing happens or you still see the generic error, double-check that the fault connector is correctly in place on the element that failed. (Also ensure the Flow is activated if it’s an autolaunched flow running in the background.)
6. Refine the user experience: Take a moment to refine your error message text. Is it understandable? Does it guide the user on what to do next (if anything)? Often a friendly apology and next steps (like “please contact support with this info” or “try again after correcting the highlighted fields”) can turn a frustrating error into a manageable task for the user. Also confirm that any notification you send has enough detail: include the Flow name, relevant record info (like record Id or name), and the error message, so that whoever responds can quickly jump in. Consistency is key – if every Flow error email you send has a similar format, your team will know immediately “this is a Flow error alert” and how to proceed.
Pro Tips for Smooth Flow Error Handling
-
Add fault paths to every Data element: As a best practice, anytime you use a Create/Update/Delete or callout in a Flow, attach a fault connector to it. Even if you think it “won’t fail,” plan for the unexpected. This proactive approach makes your automations more robust and prevents those random flow error emails from showing up in your inbox. It’s much easier to build the error handling while designing the Flow than to troubleshoot a broken Flow in production later.
-
Keep user messages simple: Users don’t need to see a 5-line error code. They just need to know if the action worked or not, and what to do if not. Phrases like “We hit a snag”, “Oops, something went wrong”, or “Please fix the highlighted errors and try again” can be paired with a specific pointer (like “Email is required” or “Unable to save record”) to give clarity. Save the nerdy stuff for the admin notifications or logs.
-
Notify the right people (maybe even yourself): If a Flow fails silently at night, you want to know ASAP. Set up fault path emails to go to a support queue or your inbox. You can even route them conditionally – e.g., if it’s a low-priority process, maybe just log it; if it’s mission-critical, page someone or send a Slack alert. Since you can customize recipients, consider sending to a group email or Chatter group so multiple team members see it, rather than just the default “Flow owner” or last editor. This way no error gets ignored.
-
Link to internal resources: If you have a knowledge article or internal wiki for certain errors, consider adding that info. For example, if a common error is a validation rule, your fault path screen could say “Error: Phone number is required. (See Phone Input Guidelines on the Intranet for valid formats.)”. This might be overkill, but it’s an option for a polished experience. In many cases, just telling them to contact the admin with the error details is enough.
-
Re-use and standardize: If you find yourself adding the same fault-handling steps in many flows, you can streamline this. For instance, you might create a Subflow that sends an error email (accepting the
$Flow.FaultMessageand context as input). Then every Flow’s fault connector could invoke that subflow. This avoids duplicating email logic everywhere. Likewise, if you log errors to a custom object, have a subflow or Apex action to create that log. Standardizing your approach means faster building and a consistent format for all Flow errors in your org.
(For more on making your Flows scalable and robust, check out our article on Salesforce Flow Best Practices, where we discuss fault paths and other pro tips in depth.)
Wrapping Up and Next Steps
No more cringe-worthy “unhandled fault” messages – you’ve now got the tools to handle Flow errors like a champ! By using fault paths and the $Flow.FaultMessage variable, you ensure your Salesforce Flows fail gracefully when things go wrong. Users get clear, helpful feedback instead of cryptic errors, and you get timely notifications with all the details to fix the issue. This not only saves you troubleshooting time, but also builds trust with your users (they’ll see that errors are anticipated and managed, not random and scary).
Now, take your Flow skills to the next level. Error handling is just one piece of mastering Salesforce Flow. If you found this helpful, imagine what else you could do with a complete understanding of Flows from start to finish. 🌟 Ready to become your team’s go-to Flow expert? Enroll in our in-depth Salesforce Flow Course – 2025 Salesforce Flows: The Complete Guide. You’ll learn best practices, advanced techniques, and real-world examples to build powerful automations with confidence. Don’t let Flow errors (or any Flow challenges) hold you back. Join the course today and get on the fast track to Flow mastery!
Happy Flow-ing, and may your fault paths never be lonely! 🚀
Salesforce Saturdays
Join the Salesforce Saturday newsletter. Every Saturday, you'll get 1 actionable tip on Salesforce technology or career growth related to the Salesforce Industry.
We hate SPAM. We will never sell your information, for any reason.
